Jefferson Swivel and Secretary

Wednesday, December 28, 2011

Rusting screws for a primitive antique look

I have always liked the look of painted antiques and how the paint seems worn (battered in some cases) and all the patina that naturally comes with age. Some of the patina is difficult to emulate, while other aspects are fairly easy. One such way to help make a new piece have the aged and more authentic look is to use rusty hardware (hinges, screws, square nails, etc). You can buy this look already done but it's expensive. I have been doing the rusting process myself for several years and it's relatively easy and much cheaper, while not entirely safe if you don't take some precautions. 

First you have to get all steel nails, screws, hinges or whatever you plan to rust. I purchased 200 #8 x 1" slotted screws for this demo and they cost me $12 in bulk. They come with a zinc coating on them all bright, shiny and new. To get them to where I want them, all rusty and grungy looking, I began with a dip in a bath of muratic acid, the kind used for swimming pools. I get mine at the big box store. It's diluted quite a bit and works good for this process although a respirator and doing this outside is a must (shop tools and their steel surfaces will rust as well just from the fumes in the air). The fumes from the acid is very unpleasant to breathe. After I have the respirator on and I'm in the grass outside away from any concrete (muratic acid will eat concrete) I pour the acid into either a plastic or glass jar till it just covers the screws etc. You'll see a yellowish bubbling froth start to appear. After a few seconds the froth dies back down and has eaten all the plating that is put on the screws. It gives a dull grey appearance.
Next I pour the acid back into the jug it came in (it can be used over and over) and pour in plain water into another plastic or glass jar. Dump the screws into the water, let them set for a few minutes then simply pour out the water and place the screws on a shop rag and let them air dry. It usually takes 24 hours for them to be ready to use. If it doesn't get enough rust the first go around I squirt more water on them and let it set again and completely dry. It's rare that I have to do it more than twice. Then once dry, they look like the aged, old screws almost every antique has.   If it was this easy to get the aged patina on wood, my job would be simple.

Sunday, December 18, 2011

Taking Quailty pictures of your work pt. 2


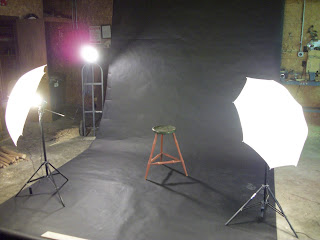
    I thought it may be beneficial for some of you to see how I actually set up to take the pictures for my Website. All you need are three lights, a backdrop, a camera and tripod. 
   The first light is called the key light, it rakes across the piece at about a 45 degree angle to the camera and sets closest to the piece. The next is called a fill light, it rakes across on the opposite side again at a 45 degree angle. So it doesn't overpower the key light, it gets moved back and forms a wider light cast. The last light is called the back light. It does just what it states, it lights from the back, (notice it's just a cheap clip on light stuck on a dolly).


This is pretty easy to do and you can do it all with cheap incandescent clamp on lights. If you want to learn more, YouTube has several videos on the subject and they make pretty good sense. That's where I went to learn a bit more.
  
Notice the shadow
 
Shadow is gone
     All I do is roll out the back drop, set my piece of furniture on, and start playing with shadows or rather try to make them disappear. If you can get it to look like the piece is floating your doing it right. It's probably easier to do on a white backdrop or lighter color but when I originally took my pieces to the photographers, all she had was a black backdrop, and I wanted my website to be the same on future inclusions so I had to get the black one. 
   
    Now once the lights look good to you,  start snapping photos without the flash on and check each picture to see if it's appealing to your eye. If you see hard shadows adjust the lights till it's gone or in a little less visual position. It takes some finagling but it's not difficult. You just need a bit of patience, and you can get really pretty decent photos for next to nothing, maybe $200 or so. Once you get it set up, you can do all your own pictures, whether for a website or to send in to a magazine for awards, contests, articles etc. I have had a few pieces in a couple different home magazines and all but one I took myself.
   

     Magazines usually don't want any distraction material such a teddy bear in a chair or just a piece placed next to a wall where trim and wall paint pull the eye away from the piece.  That's why a back drop works great. All your focus is on the piece your photographing and not the distributive elements. Plus it looks so mush more professional without distractions. Your pictures will take on a higher quality and be more visually stimulating to potential customers, a plus if you are trying to sell your wares.  


While this picture isn't horrible, it's still has too many distractions. The light socket for one thing, but the contrast from the wall color and the trim plus the floor, are very eye catching and takes the viewers focus from the actual piece your trying to draw attention to.

This has better visual focus and keeps the eye looking at the chair instead of a disruptive background.

Saturday, December 17, 2011

Taking Quality photos of your work pt. 1

After spending time and money to have my furniture photographed by a professional photographer, I decided I'd give it a try myself. I had went to the photographer a few times, and she did an outstanding job, but it was such a chore to drag 4-6 chairs and large cabinets to her studio to have it all done. I saw the background she used and the lighting and honestly it didn't look all that hard to try on my own.                                                                                                  

First I bought a back drop which is really just a 9' wide x 36' long roll of heavy paper on a cardboard tube at the local camera shop, they come in several colors, I choose black, cost $40. Then I bought a couple cheap lights off Ebay that came with the umbrellas, another $40 for the pair. I already had a inexpensive Kodak digital camera that takes a 12 mega pixel photo, around $120 new. I was pretty well set other than a tripod that was $25 at "Wally World".  So for the cost of a couple trips to the photographers studio I had what works just about as well and I can do it at home, in the shop where the furniture already is. Now to see if it would work.

    I have never really done any kind of picture taking except for the basic stuff, family photos, kids as they grow up and the like. When your trying to get good quality photos of your work for a magazine or just to put on a web site, lighting is key. At first I had to play with lights for a couple hours checking where the shadows were and if there was any glare, etc. After some monkeying around and adjusting the light angles, it's really not to hard to get pretty nice photos. The photo of the Jefferson Swivel and the Slant lid Secretary on the opening pages of this blog is one of the first I did. You can see how well it turned out. Another I did recently is the Shaker Table above. While I have a shadow behind the table somewhat, it still turned out pretty clear.  

    I now have a place in my shop were I can pull the backdrop down tape it to the floor, set my piece on it and within an hour or less get several photos at different angles that look, in my opinion, almost as good as the pros did without spending the time loading, unloading, setting up, photographing, loading back up, and waiting a week or so to get the photos plus a $100 an hour fee. I wouldn't call myself a photographer by any means, but I do call myself a do-it-yourself cheap skate.

Wednesday, December 14, 2011

Hide Glue's Holding Power and Repairability


I was impressed with using the Hot Hide Glue yesterday on my first big project, so I thought I'd make a short little video on how well it holds and how it can be repaired. First I tried an end grain glue up, and while it had an initial tack, it didn't hold like most end grain glue joints, with a edge grain to edge grain joint it only took a few minutes to set up under just hand pressure. Five minutes later I tried breaking the joint and proved to myself how well this stuff works. Again I am behind on the times of using something that everyone else already knows about, but at least it's better late than never. If Hide Glue has held all those antiques together, why can't it hold the antiques of the future together as well. I think I've found a new old glue for my shop.

Tuesday, December 13, 2011

Hide Glue in a Yellow Glue Era

After a ton of reading about and hearing about it from other woodworkers, I decided to try Hot Hide Glue. I bought a cheap little $10 crock pot from "wally world", and being that I live close to a Grizzly tool store I bought a can of ground hide glue crystals from Behlen.

I have to say at first I was pretty ticked at how it was coming out. I put a couple tablespoons of glue in a glass jar and a couple tablespoons of water, put it in the crock pot and a couple hours later I came back to find a blob of a mess. What did I do wrong?

Well, your suppose to do a 1 to 2 ratio first of all, 1 part glue to 2 parts water. Then let it set in a sealed jar for a while until it turns to the gel-like consistency of fish eggs or tapioca pudding. Then it goes in the crock pot and heats till its nice and runny and melted completely, its only suppose to get to a temperature of 140-160 degrees from what I've heard.

After being real flustered, I went to the trusty ole Internet and found a video on YouTube from Stewart MacDonald. This video is great, it shows the same brand I had, and tells in a short 1:55 long video how to mix and use the stuff.  OK, so I tried again using this method, and it worked perfectly!

 I am making a huge entertainment center right now to fit a 55" flat screen and it has a dovetailed carcass, the hide glue went on nice and even and dried within a minute or so to the gel stage. One thing you have to get use to from using the "Yellow Stuff" is the extremely fast set time of Hide Glue. I did one section at a time and even used a heat gun to pre-warm the pins on the dovetails to make sure the glue had a little bit longer open time. It worked great, plus one benefit I didn't know, is the glue acts kinda like a lubricant to make slipping the joint together easier. I have to say that after my first day of actually using Hide Glue on a project, I'm kinda liking it. I want to build furniture that will stand the test of time. Yellow Glue has only been around maybe 60 or 70 years vs. the 2000 or so Hide Glue has been around, I think I'll be using more hide glue. Plus it's repairable, if a part ever needs to be fixed just heat the joint and it relaxes the glue making it fixable, not re-make-able.

There's that old adage, make it right to begin with and it won't come apart. While that has a lot of truth in it, how do we know that in 75 years Yellow glue doesn't break down and become moldy or something. Maybe I should think about the future more, glues break down, it's almost guaranteed, maybe I/we should give Hide Glue more praise and use it more so the future repair shops don't think of this as the Yellow Glue era and start saying, "That piece may have been in your family for generations but it's unfix-able, had the craftsman only used Hide Glue, Aunt Betty's Windsor Chair would be able to stay out of the trash pile".


Monday, December 5, 2011

Windsor Barstool

    I've been playing around with a few different ideas on making Windsor Barstools which seem to be, at least for me, becoming more popular. I've been making side chair versions for a little over a year now and thought the arm chairs might be something to think about too. I made this Philadelphia Arm chair version this past week and am pretty happy with the results except for maybe the paint choice. More on that in a second. I think this would make a great set of barstools to set at a counter in the kitchen and honestly it's pretty damn comfortable too.
                                                 Anyway now for a little about the paint.
  
     Originally I painted it with Real Milk Paint's Union Blue over Yellow Ochre and thought initially it looked decent. After a coat or two of the oil/varnish mix I top coat with, I began to see that it wasn't the right look in my eyes. I had some Ultra Bond that is suppose to make the milk paint stick to almost anything, so I mixed it in with some black to see how well it works. I am completely happy with that product. Even over a couple of coats of oil/varnish mix the black milk paint bonded and is just as tough as it is when it goes on bare wood. That's a very good thing to know when I am working on a customers chair and the paint colors aren't coming out right.
     If you've ever used Milk Paint you know it's hard to tell what it will look like till you have a coat or two of finish on. Then it's been where you have to sand back down to bare wood and it's a total pain in the hind-quarters.  I'm glad to say even if the oil is on you can change the color without all the sanding and scraping I've had to do in the past. I know my arms and shoulders appreciate that product too.